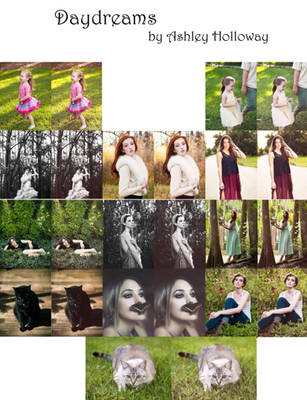

Photography Week
Today I'll be showing you some tips and tricks for Lightroom 5 that I've come to use often over the past few years of using the program. Even though I'm using Lightroom 5, these tips and tricks might still be helpful for you in past versions of the program as well as newer versions (the modules and buttons will likely be switched around a bit though). I am mostly a portrait photographer, but these tips and tricks can easily be adapted and used with any subject your lens captures. I prefer using RAW formatted files in Lightroom for the best quality.
Color Toning
No matter what you refer to it as: color toning, color grading, split-toning, etc, working with the colors in your photograph is very useful in order to create or enhance the atmosphere of your image. This can be done a few different convenient ways in Lightroom and the final results might really surprise you!
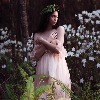
After initial adjustments to the exposure, contrast, clarity, vibrance, saturation etc of the photo, I usually then start with split toning. Split toning lets you apply hues of color to the highlights and shadows in your photo, as well as determine how saturated you would like these hues to be. Playing around with the sliders can really be an interesting option to create drama in your image. In the second image, I've showed you a subtle but still noticeable change, something I am more apt to use when I edit my own photos. I've chosen a cool blue highlight for this image and a warm red for the shadows. These tones could be pushed to be much more dramatic and saturated, as in the third image.


The other step you might use for color toning is located in the module marked: HSL / Color / B&W. You'll want to click on the word color to work on this step. In this module, you'll be able to target each individual color in your image to change its tone, saturation, and luminance. You'll want to keep an eye on the photo as you edit, as you might add some unnatural transitions to parts of the image if you go too extreme. If you're working on an outdoor photograph, the green and yellow sliders will be your best friend. I also love working with the orange section, in particular luminance, which allows me to brighten my model's skin tone. If working in b&w, I also use the orange slider, but sometimes instead of brightening I darken to enhance a model's freckles. When working on the green and yellow sections, changing their hues to warmer orange-based colors can add a more autumnal feeling to the scene (particularly helpful for me in Florida where most of our leaves don't change colors). Sliding the sliders around on each color can give you a good idea of what colors will be affected with each slider, and ultimately give you a direction for your photo. For example, if the grass is just way too bright for you in your photo, you would use the sliders for green and yellow and slide the saturation down. Since the model has a long dress on, in my photo, I've gone in a more autumnal direction with the greens and yellows.

Don't forget the temp and tint sliders at the top of the develop module for really adding a warm or cool atmosphere to the whole image.
Curves
The tone curve module can also drastically alter your photo's atmosphere and tones. While I still like using the curve adjustment layer in photoshop for more targeted uses of curve, this section in Lightroom is extremely handy.
While in the RGB channel, you will be changing the darks and lights in your image with the curve. Click on any part of the curve to drag up to lighten and to drag down for darkening. If you're at the top of your curve you'll be affecting the highlights and when you're at the bottom you'll be affecting the shadows. I usually add a simple curve to add contrast, but I often the drag the bottom end of my curve up to lift the blacks and create what some call a "matte effect." This often calls to mind a more painterly feel for me, but of course isn't appropriate on every photo.


Another handy part of the curve tool is one I didn't know about for quite awhile! If you click on RGB in the channel section, you can change it to individual color channels: red, green, and blue. This is just one more way you can really affect the color toning in your photograph in a subtle or major way! Instead of explaining them here, I'll let you experiment with them to get a grip on how they work. Just like the RGB channel, you will click on a point of the curve and drag up or down to affect it. Don't forget that you can change the very ends of the curve as well, just as I pulled up the shadows in the RGB curve. The following images show how even subtle adjustments to the curves can greatly affect your color tones.


Spot Adjustment Brush
The spot adjustment brush is useful for targeting specific parts of your photograph. While most of the tools in Lightroom create global adjustments in your image, the spot adjustment brush creates localized ones. For spots that need a bit of color temperature adjustment, contrast adjustment, brightening, darkening, etc, the spot adjustment brush is the perfect solution!

For a quick example, if I wanted to make the model's auburn hair a bit more saturated and red, I could adjust the saturation and the temperature and paint it onto her hair with the brush. To refine your selection you've painted, you can click on "show selected mask overlay" at the bottom and it will highlight the area you've painted in red, then you can use the erase tool and get rid of any unwanted selections. The adjustment brush is also great for adding some extra highlight to catch-light's in a model's eyes or even adding some definition to details with the "clarity" slider.

While, individually these adjustments look minimal, together they can create a powerful difference. Here's a quick before and after of the image I've adjusted and color-toned in this article:

Sync
Once you've got a look you really like to your photograph, the "sync" tool is the perfect step to apply your color changes to the rest of your chosen photographs. With the photo you've just worked on selected, hold down the control or shift key (depending on whether you want to select all of the images from the set or just individual ones) and select your chosen photographs. Then simply, click "sync" in the bottom right corner and then click synchronize on the pop-up screen. This will apply your adjustments to all of your selected photos, where you can then add individual adjustments to suit each photo. This saves so much time editing and getting a cohesive look. You can see these steps below:


Presets - Saving and Using
While the Sync tool is incredibly useful for working on photographs in your current set, you might want to save your adjustments for future photos. This is where presets come into play. Presets are Lightroom's equivalent to Photoshop's Actions. They're a great way to work on creating a personal editing style as well as giving you an easy way to come up with color edits quickly and efficiently.
On the left side of the screen, scroll down to the section labelled presets and click on the plus sign to create a new preset.

Then, give your preset a name, and click create!

It will then show up in your preset section and you'll be able to apply it to any photograph you create in the future. Keep in mind, different lighting situations and locations will really affect how the preset will look on an image, but by adding adjustments to each individual image, it is possible to make the preset fit better.
I hope these tips and tricks have introduced you to something new whether you're a new or veteran user of Lightroom! I use Lightroom 5 in conjunction with Photoshop CS5 to edit my photos, but I would never be able to edit as quickly and efficiently as I do without Lightroom, it's absolutely a must in my editing arsenal!